Sunday, March 31, 2013

More On Storage. + No-Crust,No Dishwashing, Deep Dish Pumpkin Pie

 More on Storage

These folding boxes are great for storage and when they are empty, you can fold them up so they don't take up space when they are not needed.  I use one for a laundry basket.  It will usually hold two loads of folded wash.  You can also use them when grocery shopping instead of bags, and they are easier to handle for transporting.  The earlier versions of these were pretty strong, but I have not been able to find that version anymore.  The current version is a little flimsy, Just don't overload them or they will come apart if you load them with heavy stuff, such as a bunch of canned goods.  I got these at Orchard Supply Hardware.


Folding Boxes


Usable Space


Lazy Daze has this flat, covered bin at the head of the cab over bunk.  I have never found much use for it as it is only 3" deep.


3" Deep Storage at Head of Cabover Queen Bunk


 It is, however, a great place to put four of these folding boxes full of paper items such as, plates, towels, bowls TP, etc.  This storage does not intrude into the sleeping space and makes a kind of "headboard".  The boxes are stackable and interlock, one on top of the other. 


Four Stacked Folding Storage Boxes as "Headboard"


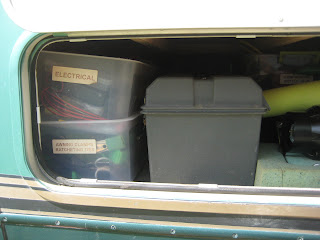
Rubbermaid and Sterilite have many different sizes of plastic storage boxes.  Some fit the overhead cupboards in my Lazy Daze.  Know what your cabinet dimensions are and find boxes to fit.  Many will stack and you can, in many cases, double the storage amount per cabinet.  Much easier to find stuff, especially if you label the boxes.  This also goes for your outside compartments.  I have found one size that I can stack to fit.  Some of my compartments are deep and much wider than the access doors.  With labels, you don't have to empty the compartment to find what you are looking for.  I have increased the usable space in several of my outside compartments in this manner.  The outside access compartment that is under the dinette seat in a Lazy Daze Mid Bath will hold two of these boxes end to end.


Rubbermaid Shoe Box


Sterilite Storage Boxes


Sterilite Storage Boxes Stacked in Outside Compartment


No Crust, No Dishwashing, Deep Dish, Pumpkin Pie


A single portion of pie crust is around 100 calories.  A single portion of this pumpkin pie filling is 180 calories.  1/3 of the calories in a slice of pumpkin pie is the crust.  You can either take the savings OR eat a 1/3 larger piece, OR maybe add a little whipped cream!  I left out the crust both for calorie savings as well as no mess of making pie crust and no dish washing.


Roger's Adaptation of the Libby's Pumpkin Pie Recipe


1 29 oz. Can Libbys Pumpkin 280 Calories

1 1/2 cups Sugar  1161 Calories

2 tsp ground cinnamon

1 tsp ground ginger

1/2 tsp ground cloves

1 cup egg substitute  120 calories OR you can use 4 eggs 320 calories

2 cans fat-free evaporated milk  600 Calories


2161 total calories using egg substitute and the FF milk.  Divided by 12 servings = 180 calories each. It is pretty much fat-free.


1/12 serving, 5 0z, 180 Calories


This recipe is for two regular 9" pies.  I use a single 9 X 12 disposable aluminum baking pan.  Just thoroughly mix all of the ingredients together in the pan.  Because of the size and depth of the pan, these cooking times that are different from the recipe on the can.

Preheat oven to 425F.  Bake for 30 minutes.  Reduce temp to 350 and bake for about 1 hr. longer.  Top should start to brown and possibly have small cracks.  Let cool on a rack for about an hour.  I then cover and refrigerate overnight so it is good and firm for serving the next day.    Easy on the whipped cream.

Should only have to rinse one mixing spoon and possibly a measuring cup.


Tuesday, March 26, 2013

Vacuum Sealing and No Dishwashing Pancakes

If you buy large quantities of dry goods such as rice, flour, coffee, corn meal, etc.  or meats, cheese etc. a great way to store and preserve them is to use a vacuum sealer.  If you have room in your freezer, you can buy that bargain tray of five pounds of boneless, skinless, chicken breast and divide them up in bags.  If you are only one or two people, you can save a lot of leftovers for future quick meals with no waste or dish washing. 

This is my vacuum sealer.  This model works on 12V DC as well as 110V AC.   It is available on Amazon


This model did get some negative reviews.  Most of them revolved around poor sealing.  I found on 12V, you need a full charge and hopefully your solar is putting in at least 10 amps when you use it on 12V.  This gives line voltage a boost and it will seal a lot better.  If you think there is a problem, you can always wait a few seconds and make a second seal on the same seam without the vacuum.  Some items are difficult to get a good seal on even on 110V.  The problem is when whatever you are sealing leaks or gets sucked in to the seal area.  This happens with flour, coffee mate or any other powdery contents.  Sugar, coffee and cornmeal usually do not have this problem.  I have sealed a paper towel across the top of the contents to "shield" the sealing area.  Another good thing to do is hold a straightedge on the bag above the contents, on a flat surface, in front of  the seal area to keep powder from getting sucked in to the seal.  I usually double seal these items anyway.  Meats, poultry, fish, etc. will leak juice into the sealing area as they are being vacuumed.  I put the meat that I am going to seal in a vacuum bag, fold over the top and freeze.  After the contents are frozen, you can vacuum them down with no juice to leak.  Be sure you wipe the sealing area clean and dry before sealing.


Vacuum sealing prevents freezer burn and mostly eliminates oxygen from the bag, so that food lasts a lot longer whether you freeze it or are storing dry items such as coffee, sugar, etc.  It also prevents insects such as weevils, ants, etc.  Great way to preserve leftovers and you don't have to consume 3 pounds of meatloaf before it goes bad.  Another plus is you can fix a great meal in a few minutes from items that you have already cooked.  I checked the Foodsaver Website and they indicate you can drop frozen items in the sealed bags in boiling water for reheating.  Dinner with nothing to wash!  I suppose you could microwave them also but you would want to open them to let steam out.  I personally have not tried this.


Smoked Meat Loaf


This is some of the meatloaf that I smoked a couple of weeks ago, and should last for at least 6 months in the freezer.  Another benefit of vacuum sealing is most of the results come out fairly flat for more efficient storage.  You also don't have to worry about puncturing a paper bag of flour or sugar, or have it come open.  If you seal a larger quantity in one bag, you can leave enough room to cut open the bag, remove some of the contents and then re-seal.  Use a marker to label and date your results. 


Six Cups of Sugar


No Dishwashing Pancakes

I really like pancakes.  Problem is they are messy to mix up and leave you with a gummy mixing bowl to clean.  I have found that to make 2-3 pancakes, you can use one of these paper bowls, and a plastic spoon for mixing and spooning in to the pan.  Just throw them away when you are done and no dish washing. 


About one cup Bisquick or your favorite dry mix, about 1/4 cup egg substitute, or an egg if you prefer, and enough milk to make a batter.  BTW, even the mixes that call for water, I use NF milk. 

This little 8" saute' pan is just the right size for a single pancake.  The pancake leaves no residue and I just wipe it out with a paper towel when finished.  Again, no dish washing. 


Circulon 8" Saute' Pan


Pancakes are a great base for all kinds of one-pan dishes.  I have added cream corn, shredded wheat, corn flakes, bananas, shredded zucchini, use your imagination.  You can also make them with chocolate milk, eggnog, rice milk, soy milk, etc.

Don't try to vacuum seal crackers, corn flakes, etc in bags, as you will end up with crumbs.  They make containers and jar sealers for that. 

Wednesday, March 20, 2013

How I Shop and Where/How I Store It.

Where/How I Shop For Supplies. Then, Where/How I Store Them.


I shop for many of my commonly used items at Costco.  Examples would be:

Mushroom Soup
Chicken Broth
Canned Chicken Breast
Skinless/Bonless Chicken Breast
Paper Towels
Toilet Paper
Paper Bowls
Paper Plates
Aluminum Baking Pans, (1/2 steamer pans)
Olive Oil
Sugar
Coffee
Coffee Mate
Canned Kidney Beans
Diced Tomato
Tomato Sauce
Ground Turkey
Egg Substitute
Canned Fruit
Progresso Soup

Buying these items in quanity does several things, It saves money, and saves gas.  Ok, Rog, I understand the money but how does it save gas, you ask?  I am not running to the store frequently to get a few items that I use all of the time.  Plus, I can stay camped and not have to travel in to civilization a lot.  Less stress.  Also, If someone "drops in", I can make a larger quantity with what I have on hand.  (five can chili takes five cans)

I usually shop WalMart for other items that I use a lot and don't use enough to get the twelve packs or 25 pound bags, like rice and flour, that they have at Costco.   I try to think ahead a month or two for non-perishable items and stock ahead for about four months.

Where and how do you store all of this stuff in a 27' class C motorhome, you ask.  I have three main pantrys and two smaller storage areas. 


This is my Andy Baird Pantry.  Who is Andy Baird?  Click on the link.  The 27' Lazy Daze Mid Bath has this nice wall that accomodates this add-in pantry.  Extends floor to ceiling.  It is very simple to build and mount.  The plans are here on Andy Baird's "Eureka".  Keeps all of your most used items in plain view and easy to get at.


Andy Baird Pantry


This model LazyDaze, and some of their other floor plans, have this "bin" under the dinette seat.  I like the fact that the top lifts off.  Much easier access.  My Mid Bath model also has an outside door that accesses the end of this bin from the outside.  Most of my canned goods are stored here as it keeps the weight down low and on the strong floor.  Note that I use a marker to write on the tops of the cans so they can be identified from above without digging through the contents.  When I used to be a sailor, we did this because the moisture would loosen all the labels and then you were left with a bunch of cans that you did  not know the contents of.  A unique cooking style all its own which resulted in many "surprise" meals.  I have since downloaded an app for my I phone that is a pantry inventory program.  You scan the cans and enter what you are taking or leaving along with the expiration date.  When you go to the store, you know what is stored in this bin so you don't duplicate.  It is called "Prep & Pantry".  The free version only lets you record ten different items.  The unlimited plan is $3.99 I think.  I have found it quite useful.


Bin Under Dinette Seat


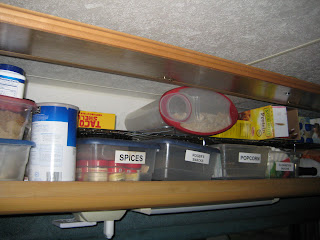
This cabinet is over my dinette and holds a lot of the lighter stuff.  Measures 6' long and 1' high.  The plastic "shoe boxes" are just the right size to fit across the depth of 14".  One shoe box is my "spice box".  I also use these wire adjustable space dividers.  Note that I have a lot of dry items such as flour, sugar, corn meal, etc stored in one quart, or two quart canning jars.  They also fit the cabinet.  You can take sugar out of that ten pound bag, and store enough to use in a jar, but not take up this space with the large bag.  The rest goes in the dinette bin in a vacuum sealed bag.  More on vacuum sealing later. 


Cabinet Over Dinette


You can also store some items under the dinette table.


Stuff It Under The Dinette


Future posts will be on how I store those bulky Costo size packages of paper towels, TP, paper plates, etc.

Another future post will be on vacuum sealing.

Saturday, March 16, 2013

Garlic Cubes, Onion Flavored Gin & Tonic and a Right-Side-Up Cake

By the way, this is what happens to all of the

great food at the Lazy Daze, Quartzsite Campout.


Visit us at:          Autos.groups.yahoo.com/group/LazyDazeQuartzsite


Garlic & Onions

Here is a really great way to buy and use minced garlic. 


I got this at Trader Joe's in California but the Dorot brand is probably available in other locations. A check of the Dorot website store locater shows an error so I don't have specific location information.  I have also gotten jars of whole peeled garlic cloves in different markets including Costco and they can be frozen.  The whole peeled cloves also make great roasted garlic as well.  I put a handful of garlic cloves and about a tablespoon of olive oil in a small covered oven dish and bake for 30-40 minutes at 350F.  Great on Wheat Thins, with Brie, etc. 

While we are on the subject of freezing garlic, you can do the same with onions.  You can freeze any quanity that suits you and your freezer size.  When I had a large freezer, I used to buy the Costco bag and peel and shred them all at once.  I know that this is controversial, but if you cover your eyes and nose , with a swim mask and keep your mouth shut, you can usually get through a whole bag without eye irritation.  Pretty comical if you get caught with this outfit but it works for me.  My son is carrying on this tradition much to the amusement of his friends.  I freeze them in doubled ziplock bags and they won't "flavor" your freezer, and BTW, your ice cubes.  Nothing like onion flavored Gin & Tonic.

If you have a lot of onions that you don't want to freeze them, or have them go bad, slice and saute' them in olive oil until they just start to brown and are really done.  Every time I do this at a pot luck they just evaporate.  Great with hot dogs and hamburgers.


Lynda's Pineapple Cherry Right Side Up Cake


Here is a great one-pot dessert (I looked up the spelling) that is usually received well at pot-lucks or family gatherings:


1 Yellow Cake Mix  with ingedients called for on the box.  ( I use Betty Crocker)
1 20oz can Pineapple Chunks
1 20oz can Cherry Pie Filling.  (Peach also works well)

Thouroughly drain the pineapple and save the juice.  If you don't really drain the pineapple your cake will usually be too soft in the middle.  Add enough water to the juice to bring it up to the one cup called for in the mix.  Put all of the cake mix ingredients in a 9 X 12 disposable pan. Mix and beat as called for on the cake mix box.  BTW, I use 3/4 cup egg substitute instead of the three eggs.  Sprinkle the pineapple evenly over the smoothed out batter and push the chunks down so they are on the bottom.  Evenly distribute spoonfuls of the pie filling in "pockets" over the top.  Bake at 350F. I found out that you need a total of 55 minutes to get this to bake through because of the extra ingredients.  YMMV*.  It should start to brown on top and the center should spring back when touched.  A great dessert  and all you ususally have to wash, is a measuring cup and bowl scraper. 

*Your Mileage May Vary


Morro Bay and Corn Casserole Report + Sumo Citrus.

Morro Bay and Corn Casserole


Camped out here at Morro Bay State Park with Larry Wade's group.  Great crowd, maybe 100 people?  Friday night Pot Luck brought out a LOT of food.  I brought Melinda's Corn Casserole featured earlier:


I mentioned that I was going to try this in a 9 X 12 instead of an 8 X 8.  Came out just a little bit thinner but more pieces this way.  I baked this for 1 hour and 10 minutes at 375F to get it to brown.  I cut in to 12 squares and it didn't last long.

Dishes to wash:  one spatula and one bowl scraper. 


Sumo Citrus

I really like Tangerines.  Seedless, easy to peel and just larger than bite-sized.  Problem is, as near as I can tell, they are only available in bags as "Cuties".  More than I can eat before they go bad.  I have searched around and cannot find them singly.  While on produce quest, I discovered these:


Odd looking and brand new on the market.  Called Sumo Citrus or Sumo Oranges.  As you can determine from the attached article they are a cross between an orange and a Tangerine.  Results are amazing!  Larger than a Tangerine, very easy to peel, seedless and very sweet.  You can buy them one at a time. Not available everwhere, I found these at Raley's/Bel Air in Sacramento.  Could not find them at Wal Mart.  There is another variety of orange that has the Sumo topknot but is smooth skinned and they are just ordinary oranges.  Look for the rough skin.

Saturday, March 9, 2013

Use Your Oven, (if you have one) AND a Couple More Recipes.

Comments on Posting Comments or Subscribing


This is still a learning process.  So far, I have not yet figured out how to create a "subscribe by email" button on this blog.  I have succeeded (by accident) in creating a blank bar under the heading, with a submit button" at the end, that sometimes leads to a "subscribe" page.  I have not, as yet, figured how to put any description in the blank line before the "submit" button".  For now, it appears that you can subscribe to this blog by clicking on the "submit" button anyway.  I  also discovered that if you click on the "no comments" or "comments" button on the bottom of each blog post,  a comment window and an invitation to subscribe by email comes up. 

If anyone wants to contact me, maybe with a solution, suggestions, recipes, questions and/or ideas,  my email: 

roger@rogernickey.com

My plan is to create one or two posts a week with some of my utensils, methods, ideas, and/or recipes so please check in once in a while if you cannot subscribe.  Thanks.


Ovens (or lack of)

It appears that many RV manufacturers (not Lazy Daze) are turning out rigs with just a cooktop and no oven.  In some cases, you get a cooktop with a microwave/convection oven as a substitute.  In other cases no oven and just a microwave.  This means if you want to bake something, heat up a leftover or make toast , you have to either be plugged in to shore power or run that pesky generator. 

Fortunately for me, my '02 Lazy Daze Mid Bath has a three burner stove with an oven.  Granted, the oven is only 6" high, but with a little creativity, you can handle most of your baking needs.  You couldn't roast a whole turkey, but there is a solution to that one too, more on that later.  BTW, a Papa Murphy's large, take and bake pizza, (14") fits the oven perfectly.

Most leftovers and small items can be heated/reheated by using a foil pan or fashioning a foil "pouch" and heating at 350F for 20 minutes or so.  You can toast bread, bagels, etc using the broiler.  What's that you say? your stove doesn't have a broiler?  I didn't think so either (even though there is a "broil" setting on the oven knob).  Others showed me that the space beneath the burner at the bottom of the oven can be used for broiling, or toasting.  I wouldn't put anything that splatters down there, I have the Traeger for that.  I got a cookie sheet from Wal-Mart, for about a dollar, that is just the right size and once you have done it a time or two, you can make toast, etc. without a lot of watching.  Put foil on it if you don't want to wash it. It will incinerate stuff, however, if you are not careful.  (at least, you will find out if your smoke alarm is working)

Floor Tile as Oven Liner

The oven is small, so you can have a "hot spot" and/or uneven heat.  I use a 12" unglazed ceramic floor tile on the bottom of the oven as a "flame tamer" to help even the heat out.  These are usually a dollar or so at Home Depot.  If they get stained or occasionally break, just get a new one.  I have seen others use a pizza stone for this but they are a little pricey.


12" unglazed ceramic floor tile


Floor tile in bottom of oven 

Note cookie sheet as broiler pan.  I also keep an oven thermometer inside to verify temperature.

The Cooktop

The cook top pan on the Wedgewood Vision stove that came with my Lazy Daze is very easy to get off for cleaning.  Basically push it back against the spring clips and lift up the front.  I learned from the manual.  This is an easier way to keep the cooktop clean.  I found these oven liners at WalMart.  They are exactly the right width and you just have to trim off a few inches to make it fit to length. 


Oven liner used as disposable burner pan.


I made a mess of this one cutting the holes for the burners.  I think it is best to remove the cooktop and use it as a pattern for the placement and sizing of the burner holes.  My next one will be a lot neater.


The Turkey (some assembly required)

Oh yeah.  The turkey.  If I needed to roast/smoke a whole turkey or a spiral cut ham, I would use my Traeger Barbecue.  There is no way you are going to get even a small, whole turkey or the like, in your RV oven.  You can buy turkey parts.  I have not tried this, but if you buy a whole breast, thigh and maybe even drumsticks, they should roast just fine in a foil pan.  Since turkey breast is done at an internal temperature of 160F and thighs are done at an internal temperature of 180F, you can monitor them separately and get each done just right.  I have successfully prepared a small, (Safeway, Costco) spiral cut ham in my oven.  In the case of the Costco ham, it was a little tall so I removed the oven rack and gained an additional 1/2" or so and it worked fine.  Just shop for a ham with a ruler.  Still a job for the Traeger. 


Recipes.  These are great for potlucks.


Here a couple of recipes I am going to try out at the Morro Bay, Lazy Daze Campout:

Melinda's Corn Casserole

§  1 #2 can Regular corn, drained
§  1 #2 can creamed corn
§  8 ounces sour cream
§  1 stick butter, melted
§  1 box Jiffy Corn Bread mix
§  1 can diced green chili (roasted are best)
§  Red pepper flakes (optional)
§  Black olives, sliced (optional)

1.Mix all together in deep baking dish, stir well. May add black olives (drained) or red pepper pieces, or green chili's (drained) or all, sprinkle black olives on top.
2.Bake uncovered at 375 degrees for 45 minutes to an 1 hour or until edges are brown, the center will be soft. Do not double recipe, but rather make two separate batches. Enjoy 

Roger's Notes:

I tried this in an 8X8 foil pan and I found the pan a little small.  I am going to try this in a 9X12 foil pan.  I baked it the full hour to get it a little brown on top and it wasn't soft in the middle.  I will report back on the change it pan size.  I mixed it up in the baking pan so nothing to wash!

Note on so-called lo-cal or diet spreads: They are at least 50% or more water and unsuited for cooking.  Check the label.


Roger's Five (or Six) Can Turkey Chili With Beans


1 lb 93/7 ground turkey
1 medium onion
1 diced bell pepper to taste
1/4 cup chili or taco seasoning mix or two envelopes of the same.  More if you like it spicy.
2, 15oz cans kidney beans, drained
1, 15oz can tomato sauce
1, 15oz can diced tomato with juice
1, 15oz can whole corn and/or sliced black olives, drained.

Brown turkey in a sauce pan large enough to hold all of the ingredients.  Drain off the meat juice early and add the onion and continue to brown.  Sprinkle the seasoning mix over the drained meat and continue to brown.  (you don't want to pour off the onion and seasoning with the meat juice)  When it looks about right, add all of the other ingredients.  Simmer for 1-2 hours to blend flavors. 

This only uses one pan and If you have the kind that has a snap-on plastic lid, your can store and reheat this without and additional pans to wash.

Maybe about 8, one cup servings.  About 250 calories each.  5 grams of fat each.


Tuesday, March 5, 2013

Meat Loaf Report

As mentioned in the Traeger post, here is the report on the smoked turkey meatloaf:


Smoke for Four Hours


Done to 180* Internal Temperature


Sliced in Half.  Came Out Perfect.


Temp was only to135* internal at four hours on smoke setting. (this is ground turkey, so done at 180*.  ground beef would be done at 150*or so)  I turned up the heat to 350* and it was done to 180* internal in 45 additional minutes.  I marinated some broccoli in Peanut Vinigarette salad dressing, made a small foil pan and roasted with the meat loaf on the gtill for 20 minutes.  Done just right.  I will probably have some more stuff on roasting/grilling vegetables later.  The addition of one pound of spicy pork sausage to the meat loaf mix made quite a difference in taste.

I sliced up the other half, froze it, and then vacuum sealed it for later.  More on vacuum sealing later. 

Sunday, March 3, 2013

My Traeger Wood Pellet Barbecue AND Some Recipes

Most all who have camped with me should be familier with my Traeger Barbecue.


Traeger "Junior" with the new windscreen and folding front shelf.

It is unique in that it burns wood pellets with pretty much the same mechanisim as a pellet stove. 


Mesquite pellets in hopper.  Full hopper will smoke for about 8 hours or grill for 1-2 hours


Advantages:

Choice of type of wood pellets for wood smoke flavor.
Even heat
Temperature controlled with the digital heat control
Great smoking

Disantavages:

Kind of heavy.
Needs AC electricity.
Finding a way to travel with it.
When it's cold and/or windy, it has a hard time maintaining the heat. (see wind shield below)

I have the "Junior" model 55 for traveling.  I took the legs off and installed the "Tailgater Kit".  This consists of a set of wheels and an insulating pad for the bottom so it won't burn your tailgate.   It stores in the back of my '00 Ford Ranger toad.  I also have the optional fold down front shelf.

They are absolutely the best for smoking Tri-Tip, Ribs, Meat Loaf, Casseroles, Turkeys, Chicken, etc.  Great for grilling Steaks, Hot dogs, Hamburgers, Sausage, Links Chicken and Fish, as they have a grease catcher and won't flare up. The flame is separated from the food.  You can actually bake in them with the optional digital temp control.  ie. set it for 350* and bake a casserole.  I use the disposable aluminum cooking pans for this.  They can get a hot spot on the bottom of the pan so I usually double up to give an air space on the bottom of the pan.  Easy clean up if you use foil on the flame tamer under the grill.


Two Tri-Tip roasts and Sausage
Note foil covered thermometer probe.
Note foil under the grate.


Just one Tri-Tip


The Electric Problem For Dry Camping

Traeger requires about 30 amp DC through the inverter for about two minutes to light and then draws about 4 amps DC through the inverter as long as it cooks.  I have a 1,000 watt inverter but a 500 watt should work as well.  You should have solar for battery charging.  I have 300 watts.  In the late afternoon, I can ususally smoke a Tri-Tip for two hours and still be 100% charged when the sun goes down. 

Costco Traeger Road Shows

Currently, on a rotating basis, Traeger has sales people and demonstraters at various Costcos.  If you call Traeger, they can tell you when one will be in your area.  You can buy a grill there as well as pellets.  They ususally have discounts and I got my "Junior" for $100 off.  If you buy one of these grills, get the Traeger custom cover.  They are made to fit your particular model and will last a long time if you don't put it on a hot grill.  It protects the barbecue from the rain and mine lives outside most of the time and it stays dry.  YOU DO NOT WANT THE GRILL OR PELLETS TO GET WET!!.  You will be in Traeger Hell.  Believe me, I have been there.  The pellets turn to mush and then harden in to a mass as they dry out. If the pellets inside the grill auger turn to mush, the only way to clean it out and get it operating again is to take it apart and in some cases you have to dig the wet pellets out of the auger tube with a screwdriver. 


Cover


Links to Accessories Mentioned Above

Traeger Barbecues

Traeger has great customer service.  They are happy to walk you through problems and answer questions.  During Quartzsite 2012, we had planned a Tri-Tip Barbecue for the following week.  I tried to start it a few days earlier and it would not come on.  Tech at Traeger walked me through testing it and we found a bad circuit board.  They sent me a new one no charge in Quartzsite and it was ready to go for the barbecue. 

 Grill Wizard Grill Brush, China Model

This is the best grill brush I have ever used.  It has replaceable Stainless scour pads


Grill Guard Wind Shield

This is a great accessory that I found at the Quartzsite RV Show.  It pretty much eliminates the wind problems and keeps the heat in, particularly if it is cold outside.

Remote Read Meat Thermometer

If you want great, consistent results barbecuing and smoking, you have GOT to have a meat thermometer.  They come in a lot of different models and this one is similar to the one I have.   I have had several wireless ones and they just don't last.  Simple is best.  The remote read lets you check temperature without opening the lid. (and letting the heat and/or smoke out)  Most of the failures I have had have been burned probe wire.  Wrap the probe wire in aluminum foil, particularly where it passes over the edge of the cooking surface and under the lid to the outside.  


Roger's Favorite Traeger Recipes

Roger's Smoked Turkey Meat Loaf

Two, one pound trays of 93/7 ground turkey.  (93% breast, 7% thigh) I use Foster Farms from Costco.
About 3/4 cup Matzo Meal, Oatmeal, Crumbs or your favorite
Two eggs (I use 1/2 cup Kirkland egg substitute
One envelope Liptons Dry Onion Soup Mix

I mix this together in an aluminum baking pan so no bowl to wash.  BTW, I use the CLEAN bare hands method.

Smoke for about 4 hours or internal temp comes to 180* Let stand for about 10 minutes and slice.

As  near as I can calculate from the ingredients, a 4 oz slice is 195 calories.  Eight, 4 oz slices in a 2 lb meat loaf. 

This is a basic recipe.  You can add any of your favorite ingredients.  In the past, I have pressed olives in to the loaf.  I have added green chili's, corn, barbecue sauce, ketchup, etc.  As I write this I am getting ready to fix one and I am going to add one pound of hot Italian Sausage that was given to me by a fellow LazyDazer and I haven't figured out what to do with it until now.  I will report on the results.

Rogers Smoked Tri-Tip

Buy nice sized, Tri-Tip Roasts.  Don't skimp on quality or size.  Don't use the steaks.  I hate to sound like a Costco commercial but they have the best.  Usually in a 2 or 3 pack.  They freeze well.  I either rub them with garlic salt or use your favorite rub. Put in a ziplock and let marinate for a couple of hours or overnight.  Bring it out about 30 minutes before smoking to let come towards room temperature.  Don't marinate in barbecue sauce.  I just start the grill on smoke, let it come to temperature, put the meat on with the temperature probe in and close the lid.  You don't need to turn them.  Usually about 1 1/2 to 2 hours to get internal temperature to 137 (medium rare)  Take them off, cover with foil and let set for about 5 minutes.  Slice thin across the grain and serve.  BTW, use a disposable cooking pan to serve and no serving platter to wash.

Roger's Smoked Pork Loin

I use Swifts Premium loins with Smoky Mesquite marinade in the package.  These came two loins in a pack and are about a foot long each.  I get mine at Costco but they are available at most any supermarket.  They also come without marinade if you want to use your own. 


You can smoke these for a while if you want, but they are done at 145* internal temperature.  I smoke mine for about 30 minutes and then turn the heat up to medium or 350*  If you start with 350*, they will be done in about 30 minutes.  Cook uncoverd in a disposable aluminum pan.  Slice in to medallions and serve.  These are solid meat and serve up very nice.  4 oz serving 120 calories.

Roger's Smoked Baby Back Ribs

If you are going to smoke more than 1-2 racks of ribs, you are going to need a rib rack.  You can see one on the traeger website. This stacks them like books on a shelf and you should be able to smoke 4 racks at a time depending on the size. Put the large ends down.   I have never skinned them.  I just rub, trim off the "clod" on one end and put them on the smoker.  What I call the "clod" is just the end where the bone and meat are kind of mixed up.  I take these parts and put them in a slow cooker with some barbecue sauce and give them about 6-8 hours on low heat. The racks of ribs need to smoke for at least 4 hours.  They can go up to another 2 if they are not fall-off-the-bone tender at 4 hours.  You can put a shallow pan of apple juice in the smoker to keep them from getting too dry or spray them once in a while with apple juice.  If you want to cook on barbecue sauce, brush it on at the last 1/2 hour and turn the heat up to high or 400*.  If you leave the sauce on too long with heat, it will just burn.  I was told by a manager at a Black Angus that they cook their ribs the day before, refrigerate and just heat them up on the grill for serving the next day.  I have tried this and they actually seem to turn out smokier and more tender.


Two Racks of Ribs in the Rib Rack


Elizabeth's Barbecued Potatoes

This is a great side dish that you can bake right along with your hot dogs, hamburgers, steaks etc. On Medium or High heat.   They won't cook on smoke setting as it doesn't get hot enough to adequately cook the potatoes.  Just put them in the oven at 350* for the same time. 

Slice up about 5-6 medium russet potatos.  (redskins are too firm for my taste)  Halve potato the long way and them slice them about 1/8" thick.
Dice up a medium onion
Elizabeth uses about a half cube of butter, but I use about 1/4 cup olive oil.
Salt and pepper to taste

Combine above ingredients in a disposable aluminum pan.  Cover with foil and cook at 350* or
 medium heat for 1to 1 1/2 hour or potatoes are soft done. Elizabeth likes to make smaller batches in foil pouches, but I prefer the pans.

Variations on this basic recipe are almost endless.  I have added a handful of baby carrots and/or sliced  mushrooms.  You can mix in cut up hot dogs, or diced spam or ham according to your taste.  Peas or corn are also interesting.

One of my favorites is to blend in a can of cream of mushroom soup and about 1 1/2 cup of diced Velveeta.  Comes pretty close to Au Gratin.