Monday, September 30, 2013

Fifty Shades Of Coffee

I am sure there are at LEAST 50 different ways to make coffee. 


I Love Coffee in the Morning


I use the 16oz Contigo cup that I have blogged about earlier.  I like coffee that has caffeine.  I like coffee that tastes like coffee.  I use good old Folgers Classic Roast, Medium grind (Costco size).  Reasonably priced, and easy to find.  It is not flavored with exotic spices or nuts.  Oh, and it comes already ground.  About 1/3 cup of dry grounds with 16oz hot/boiling water or in the Mr. Coffee, makes a great cup.  I cream with one rounded teaspoon of regular dry Coffee Mate, (not flavored or the liquid).  Add one rounded teaspoon of real sugar.  I can usually make this last for about 45 minutes of great sipping.  This is all the coffee I have for the day until next morning.  I do not care for instant in any form. 


Contigo Cup


With Shore Power and Without Shore Power

With

When plugged in to shore power, the best coffee maker for me is the "Mr. Coffee" type.  I have this Black & Decker under the counter model that came with my rig when I bought it used.  So far so good.  I have not been able to find a similar replacement in case this one dies.  I like it because it does not take up counter space and it is easy to clean.  It is programmable to come on automatically, but since retirement, I do not always get up at the same time.  I load it the night before and just press the "on: button first thing in the morning.  I don't need to be measuring coffee and boiling water first thing (or handling sharp objects.)  Any of the "Mr Coffee" types work great for RV's with shore power and most models are cheap and compact.  I do like the Keurig types and I note they are now smaller and have come down in price.  Problem for me is that to get a 16oz cup of fairly flavorful (strong) coffee you have to make two 8oz batches.  This runs the already pricey brew cups up even more.  Another consideration besides cost, is that it is much easier to store ground coffee than to store the brew cups.  BTW, I buy the Costco humongous size.  After I open the can, I fill a small can to keep in the freezer.  The rest, I vacuum seal and store in the pantry so I don't have to freeze it to stay fresh.


Black & Decker Under Cabinet Coffeemaker


Humongous Size, Freezer Size, Vacuum Sealed

Without

I do not care for instant coffee.  I like it BREWED.  My weapon of choice (without electricity) is the Melita, one cup cone.  I brew it directly into the cup, so it takes a little co-ordination.  (difficult first thing in the AM)  Same 16 oz cup and same 1/3 cup ground coffee.  I pour boiling water from the teapot into a known measure for pouring in to the cone.  I just fill it to the top and then stir to be sure all of the grounds get in to the mix.  When you finish, the grounds come out with the paper filter and you can pour a little hot water through the cone to clean it.  No washing!  I have heard a lot about the French Press.  They make great coffee, (like the Melita) but a lot of cleanup.  I used to use a percolator.  Problem is that they boil and recirculate the coffee.  Much different flavor. 


Melita Cone On Contigo Cup


A Little of Both

This is still in the experimentation stage.  My rig has a 1000W inverter.  It is installed next to the house batteries with 00 Welding cable through a 100 amp breaker.  This one-cup Black & Decker Brew N Go electric costs less than $20 and makes a 12oz cup in about a minute and a half and draws 800W.  This is an 80 amp draw on the battery bank through the inverter for a minute and a half.  I tried it twice when the batteries were at 100% and it did not draw them down that much.  Line voltage was 12.8V when I started.  It drew down to about 11.8V when brewing and came back to 12.0V at rest.  I tried this all the way down to 80% charge on the Tri-Metric and it worked fine with no complaints.  I even made two cups at 80% charge and it was still OK.  Clean up is the same as with the Melita.

Black & Decker Brew N Go

 
 PS
 
I now use this method regularly when boondocking. 


BTW, if you like my blog, please spread the word!

Rogersramblings41.blogspot.com


You can email me: Roger@rogernickey.com


Tuesday, September 24, 2013

Custom Entry Mats

Some time ago, on the Lazy Daze Yahoo board, there was some discussion about replacing the entry step, well mat.  (BTW, Lazy Daze factory has exact replacements as well as running board non-skid panels for the E-450)


There was some discussion about a place that made custom replacements using recycled tires.  Some among us, bought them.  I finally saw one in Andrea's rig at Balloon Fiesta and thought that I might like one.  Turns out that the place that makes and sells them is on the way for others of our group driving down from Colorado to Abiquiu, so we called ahead and had some made up.  You can order these to your size and have colored beads as spacers in your color choices.  Allow about 1/2" smaller than actual measurement so they don't "bunch up". 


I did my best to scan the brochure that they have as they do not have a website.  I am hoping that Elizabeth doesn't see this or Magic the Wonder Horse will have one of the giant ones for her trailer.


How Do You Milk An Almond?? + Pudding!

Milk From A Nut?


I am probably the last person to try Almond Milk.  Elizabeth was out of regular milk at her apartment but did have some almond milk.  I was not enthusiastic but I had to have something for my cereal.  Not bad!  In fact....I liked it.  It's lower in calories as well.  This stuff is great as you can buy it in "brick pack", (unrefrigerated until opened) AND it keeps for around a year (unopened) at room temp.  Perfect for RV use when you can't get to the store.  You can bet I will have a couple of quarts in the pantry from now on. I have tried rice milk for Bisquick pancakes as my mother was lactose intolerant and I tried it as an experiment.  Great pancakes and they were the first pancakes she was able to eat in years.  (BTW, as far as I know, there is no milk or dairy in regular Bisquick)

Pudding!


One of the things that I use milk for, is making Jello, Sugar Free, Fat Free, Cook and Serve Pudding.  This is great stuff but it is getting harder and harder to find.  Everyone buys instant. In my opinion, the instant is no where as good as the cooked kind.  The cooked has great flavor, great texture and is easy to fix in the microwave or on the stove top. You will not miss the fat and sugar.  I microwave it in Ziploc four quart containers when I have electricity.  With the two cup version, the four cup Ziploc is just the right size and you don't have to use a separate mixing bowl. (use the push mixer). I read up on non-dairy milks and cook and serve puddings.  Mixed results.  It is reported that rice milk won't set up at all.  It is said that Almond milk works but has a softer set.


I made a batches of vanilla and chocolate pudding with Almond Milk.  The set is definitely softer with the vanilla but pretty much normal with the chocolate.  It will stand up by itself in the container when spooned out.  Hint of almond in both.  Still very tasty.  I will probably continue to use dairy milk, but the Almond Milk is OK for backup and variety.


BTW, if you like my blog, please spread the word!

Rogersramblings41.blogspot.com


You can email me: Roger@rogernickey.com

Saturday, September 21, 2013

Traeger Smoked Baby Back Ribs, (Johns Ribs Recipe)

We barbecued baby back ribs on the Traeger Barbecue tonight. I got Costco's pre-rubbed ribs.  (say that a few times fast if you can) This is four racks each cut in half to fit the rib rack. I smoked them 5 hours and used the John's Ribs Marinade recipe from an earlier post.  Put the marinade on after 5 hours of smoke, raised the temp to 400 for 15 minutes to give them a glaze.  Probably the best I have ever made.  


It Begins


Smoking


Waiting


Waiting


 Halfway


Done!


Really Done!


BTW, if you like my blog, please spread the word!

Rogersramblings41.blogspot.com

You can email me: Roger@rogernickey.com


Uh Oh, Puddle Under The Gray Tank + Dinner + Sunset

Just North of Temecula on I-15, I ran over a piece of metal in the road.  I was boxed in by traffic and couldn't avoid it.  Swerving in the motorhome, towing the Ranger pickup is not a good idea anyway.  I heard it hit underneath the coach so I pulled over at the first chance to look for damage.  Didn't see anything so went on to Flagstaff.  (little did I know that the gray tank was punctured but empty so it wasn't leaking)  When I parked at the Sandia Casino outside Albuquerque, NM, I noticed the puddle under the tank.  Sure enough a small cut in the lower corner of the tank.


Small cut.  You can just see a drop forming at the bottom


I cleaned the area with acetone, and filled the cut with my hot glue gun.  Then patched over the area with Eternabond tape.  No leak! Looks like a permanent repair.


Fixed!


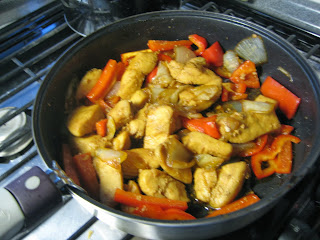
Fixed the chicken with peanut sauce recipe this evening using Yoshida sauce instead of the peanut sauce.  I used too much Yoshida and had to drain some off.  Pretty good but not as good as with the peanut sauce.  If you haven't tried the Calrose medium grain rice, you should.  I use 1 1/2 cup rice and one 14.5 oz can of chicken broth is the rice cooker. 


Yoshida Chicken


Sunset at Abiquiu Lake, NM


Sunrise at Abiquiu Lake, NM


Wednesday, September 18, 2013

Back On The Road + Dinner!

Here we are on the road headed to New Mexico at an I-40 Rest Stop.  Next stop: Cracker Barrel, Flagstaff, AZ.  Then on to Albuquerque, and Abiquiu, NM.  Long term destination: Fernley, NV Amazon captive labor camp.


Lazy Daze waxed, Boots in his stateroom, (bathroom)


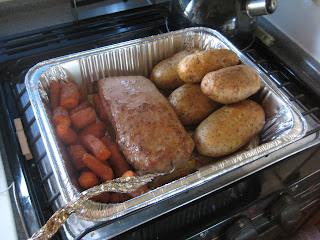
Previous night dinner:  More pork loin, baked potatoes and roasted carrots:


All in one pan, no dishes to wash!

Monday, September 16, 2013

Replacement Lazy Daze Shower Dome


Saturday, 9/14/2014, I went to the Lazy Daze Factory, (Mother Ship) to look at the rumored shower dome replacement.  Steve showed me the parts and offered to fabricate one up if I wanted to buy one.  I told him to go ahead and he said about 45 minutes. (under $200) This is a very robust, professional, well engineered part.  Tig welded aluminum frame and Acrylic dome.  Steve said it should last at least 15 years.  It will fit my '02MB.  I did a copy and paste of the installation instructions below.  It does not use caulk/sealant.  Compression fit of the "D" gasket should make it water tight.  I will post the results after the installation.  BTW, he supplied the 6, SS screws and the drill bit.  Only part of the installation that might be a little difficult is drilling the front center screw hole as the bathroom skylight is in the way on the MB.  He said to open the vent and that should give ample clearance to get a drill lined up.


From the top.  Protective film still in place.


From the side showing mounting holes on the front edge.


Underneath, showing the rubber "D" gasket.


Paste up of Steve's instruction sheet: 

We had a difficult time pasting this up so I hope nothing is missing.


READ FIRST!
INSTALLATION INSTRUCTIONS FOR REPLACEMENT
ACRYLIC SHOWER DOME LID WITH ALUMINUM FRAME.
1.  Remove the original plastic shower dome and all of its mounting screws securing it in place.
 
2.     Completely remove the white vinyl bulb gasket that is mounted on top of the silver aluminum frame that is attached to the motorhome roof.  Make sure the top of the silver aluminum frame is smooth and clean once the bulb gasket has been removed.
 
3.     Install the new dome lid assembly over the existing silver aluminum frame.  The new dome lid frame assembly has three vertical slots on two of its opposite sides.  These slots must face the front and rear of the motorhome.  Not toward the driver and passenger sides.  The new dome lid assembly should drop down into place with minimal resistance.
 
4.     Center the new dome lid assembly left and right (driver to passenger sides) to the silver aluminum frame on the motorhome roof.  Use a tape measure and check the distance between the outer bottom edge of the new dome lid frame and the vertical side of the silver aluminum frame underneath. It should measure approximately 9/16 ths on both sides at the forward and rear ends.  If you need to adjust the assembly, raise it up slightly so it can be moved to the left or right without pinching the black bulb gasket that is installed underneath.
It  is very important that the new dome lid assembly is properly centered on the existing silver aluminum frame.  This will help assure that the black bulb gasket is setting properly on top of the silver aluminum frame to prevent water entry.
 
5,  Go inside the motorhome and make sure that the black bulb gasket is uniformly exposed on all four sides of the silver aluminum frame.  There should be approximately 3/16 ths of an inch of gasket showing.
 
6.     Once the dome lid assembly is centered correctly, make sure its frame is setting parallel to the roof.  Then use a sharp pencil and mark the inside of all six vertical slots located on the new dome lid assembly frame.  The pencil should leave clear vertical lines showing the position of the slots on the silver aluminum extrusion underneath.  NOTE:  The vertical slots were not designed to line up with any of the original screw holes.
 
7.     Mark the forward end of the new dome lid assembly frame so you know which is front and rear.  Remove the new dome lid assembly from the silver aluminum frame underneath.   
8.     Clearly mark a horizontal line through each pair of vertical pencil marks which you previously made on the silver aluminum extrusion using the new dome lid frame assembly vertical slots.  The horizontal line should be marked exactly 5/16 ths of an inch down from the top edge of the silver aluminum extrusion that contains your vertical pencil marks.  This will put the horizontal line on the vertical center point of the extrusion.
9.    Reinstall the new dome lid assembly back onto the silver aluminum frame making sure that your mark is at the forward end.
10. Reposition the dome lid assembly so that its vertical frame slots align precisely back to your vertical pencil mark.
11.  using a 9/64" drill bit, drill a hole through one of the vertical slots into the silver aluminum extrusion behind.  Select a vertical slot that gives you the easiest drill access.  Make sure the drill bit is centered in the vertical frame slot and on your horizontal pencil mark.  Keep the drill as perpendicular to the frame as possible while drilling the hole.  Do not allow the drill bit to wander.  You will drill through the outer silver aluminum extrusion only.  Do not drill through the main aluminum frame behind.
12. Install one of the supplied #8 half inch stainless steel Philips head screws into the hole that you just drilled.  Tighten the screw so that it will secure the frame from shifting.
13. Now go to the opposite side of the new dome lid assembly and select a vertical slot that gives you the easiest drill access.  Verify that the new dome lid assembly is positioned so that its vertical frame slots align precisely back to your vertical pencil marks.  Again make sure your drill bit is centered in the vertical frame slot and on your horizontal pencil mark. Keep the drill as perpendicular to the frame as possible while drilling the hole.  Do not allow the drill bit to wander.  You will drill through the outer silver aluminum extrusion only.  Do not drill through the main aluminum frame behind.
14. Install one of the supplied #8 half inch stainless steel Philips head screws into the hole that you just drilled.  Tighten the screw so that it will secure the frame from shifting.
15. Now drill each of the four remaining vertical slots as you did the first two.  Select and drill in order the easiest to access with your drill.  NOTE:  On the 261/2' Mid-Bath the bathroom 14" X 14" vent will impede access to the forward center slot.  Opening the vent lid fully will give your drill motor additional clearance.  However this hole will probably end up at a slight downward angle.
16.Install the remaining four #8 half inch stainless steel Philips head screws into the holes that you just drilled.  Tighten the screws in until they are tight then back each screw off one full turn.  Also loosen the first two screws that you installed one full turn.
17. Firmly push down on the top of the new dome lid assembly frame on one side above the middle screw location.  While pushing the frame down as much as possible, tighten all three screws.  The vertical slots in the new dome lid assembly frame create vertical adjustment.  This will allow you to compress the black bulb gasket underneath the dome creating a water tight seal.  The more you compress the gasket the tighter the seal.  Repeat this procedure on the opposite side.  Make sure all six screws are tight.
18. Inspect the shower dome from inside the shower.  Make sure that the gasket is centered to the frame and uniformly compressed.  Verify that no light is coming through the gasket area.
 

BTW, if you like my blog, please spread the word!

Rogersramblings41.blogspot.com


You can email me: Roger@rogernickey.com


Thursday, September 12, 2013

Peel, Slice And Wedge


Peach Wedger

On Amazon


I find this very useful and I now eat fresh peaches and nectarines quite often where I avoided them before because they were just to messy.  If you line up the oval pit cutter portion with the groove in the side of the fruit, it will extract the pit and wedge the fruit as you see here.  Caution.  Use FIRM fruit, otherwise you will have smashed peaches, nectarines, etc.


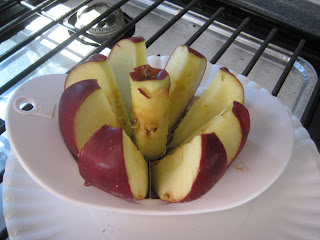
Apple Wedger

On Amazon


This wedger works great.  Way cheaper than buying those bags of wedge cut apples for snacks, AND you can pick the type of apple that you eat.


Apple Slicer, Corer, Peeler.  


  The apple spiral cutter is very useful if you are making a cobbler or pie. You can prepare about 6 apples in no time. All you have to do after processing the apple is cut it in half across the spiral and it is ready sliced for baking.

On Amazon


youtube demo of apple peeler, corer, slicer


Rotato

On Amazon

The Rotato will peel 8 lbs of medium russet potatoes in about 10 minutes. It is a good idea to use potatoes that are medium in size and symmetrical. This model also works on AA batteries. Grandchildren can be easily trained and amused by this tool. One of my granddaughters loves to prep the potatoes for Grandpa's famous whipped potatoes. (A real labor saver, for me)  Mine is currently in storage but you can see one in action on the youtube link below:


youtube Rotato Demonstration


BTW, if you like my blog, please spread the word!

Rogersramblings41.blogspot.com


You can email me: Roger@rogernickey.com


Saturday, September 7, 2013

Ranch, Chicken, Brussels Sprouts, Pasta and Secret Sauce, One Pot Dinner


2 cups dry elbow macaroni, boiled al dente
12 oz thin sliced boneless, skinless chicken breast
12 medium Brussels sprouts halved lengthwise and steamed about 10 minutes
2 cans secret sauce.  (Cream of Mushroom Soup, OR you could use Cream of Chicken, Celery, etc
1 envelope Ranch Dressing Mix.  Two envelopes make it REALLY Ranch.
1/2 soup can milk

Sprinkle any seasoning you like over the top.  This time I used "Emeril's Original Essence". (mostly salt, pepper, paprika, garlic powder and onion powder). 


I combined everything except the Emeril's sprinkle in an aluminum baking pan and baked covered at 350F for 40 minutes.  Another 20 minutes uncovered.

2086 Calories in entire casserole
6 servings @ 347 calories each
224 calories per 8 oz serving

Oven Gloves


BTW, in case I haven't mentioned it before, get some good oven gloves.  I got these at Smart & Final quite some time ago.  They are commercial grade, heavily insulated and go half way up your arms so you don't burn yourself reaching in the oven.  Also great for barbecue.  You need both hands to handle these aluminum pans with heavy contents.


BTW, if you like my blog, please spread the word!

Rogersramblings41.blogspot.com


You can email me: Roger@rogernickey.com